Automated AlmaLinux 8 Installation on Dell PowerEdge R430
In this guide, we will demonstrate the full process of deploying AlmaLinux 8 on a bare-metal Dell PowerEdge R430 server using a custom ISO generated by net2boot.xyz. We will cover network configuration, LACP bonding, and automated disk partitioning.
1. Generating the ISO
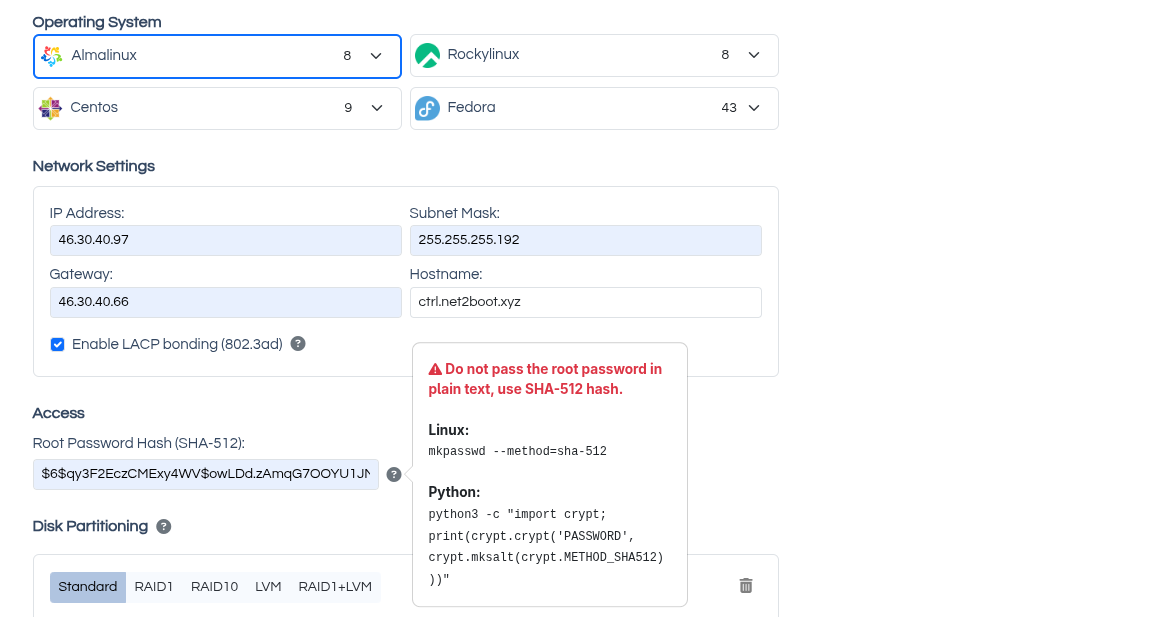
Go to the Create ISO form and configure the following:
- OS Selection: AlmaLinux 8
- Network: Static IP, Netmask, Gateway, Hostname.
- Bonding: Checked "Enable LACP bonding (802.3ad)".
I checked the bonding box because my switch ports are configured with LACP Fallback. If your switch does not support Fallback, do not enable this option, otherwise PXE boot will fail.
Root Password: Enter the generated SHA-512 hash of your root password (check the tooltip for instructions on how to generate it).
Disk Partitioning Strategy:
Since we are booting in Legacy BIOS mode, I selected standard partitioning (no UEFI).
Goal: RAID 1 for the OS (on two 960GB SSDs) and a separate partition for VM storage (on a 3.5TB SSD).
[root@ctrl ~]# lsblk --nodeps -o NAME,SIZE,TYPE,MODEL --exclude 7,11,251 --sort SIZE
NAME   SIZE   TYPE  MODEL
sdb    931.5G disk  CT1000BX100SSD1
sdc    931.5G disk  CT1000BX100SSD1
sda    3.5T   disk  INTEL SSDSC2KB03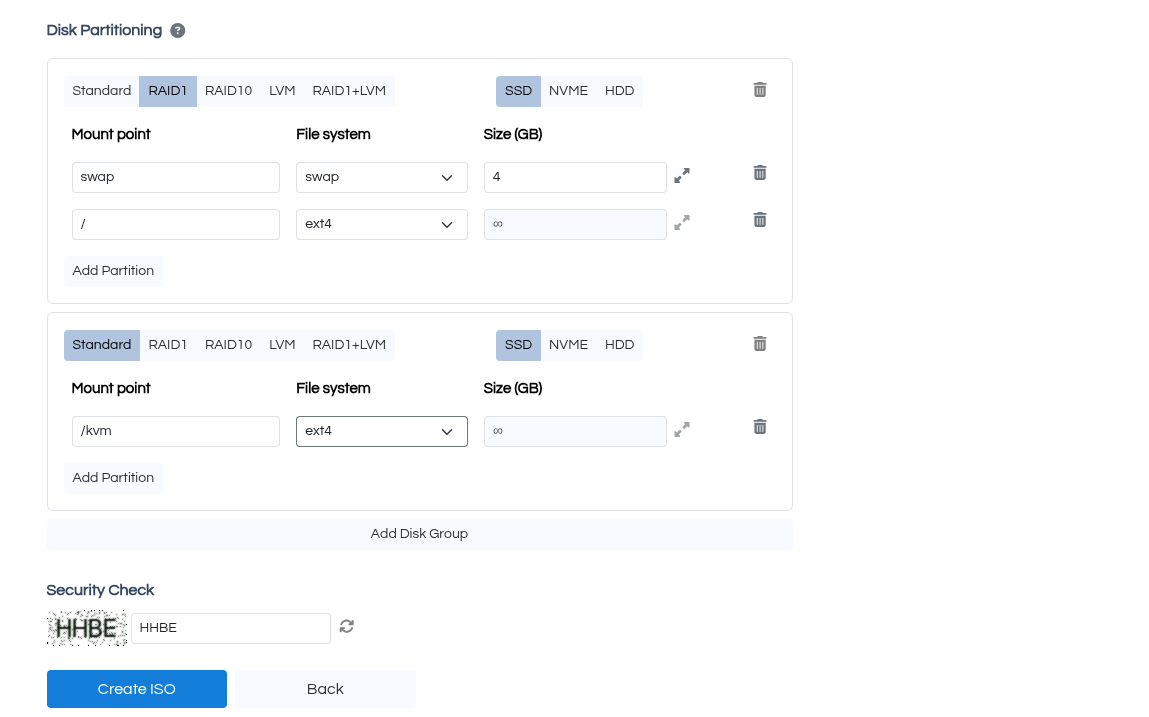
Note that for each group, I selected SSD as the disk type. If you have NVMe or HDD drives, be sure to select the correct type.
If you want to test this ISO on a virtual server, always select HDD as the disk type.
How does the installer choose disks if we don't provide device names or serial numbers?
net2boot sorts disks by size — the operating system is always installed on the smallest disks.
Additionally, the form includes the disk type — in case the system has different drive types (e.g., SSD for OS, NVMe for databases, and HDD for backups).
This approach covers over 95% of possible scenarios.
Complete the captcha and click Create ISO. The download will start automatically (~2 MB).
2. Verifying ISO Content
Before connecting the image to the server, let's look inside.
Mount the ISO locally to check the contents:
net2boot@thinkpad:~/Downloads$ sudo mount -o loop ctrl.net2boot.xyz_155.iso /mnt
mount: /home/net2boot/Downloads/mnt: WARNING: source write-protected, mounted read-only.

net2boot@thinkpad:~/Downloads$ ls /mnt
autoexec.ipxe  boot.catalog  esp.img  ipxe.lkrn  isolinux.bin  isolinux.cfg  ks.cfg  ldlinux.c32
We see the following files:
autoexec.ipxe— iPXE scriptks.cfg— Kickstart fileisolinux.cfg— Syslinux bootloader filesesp.img— UEFI boot partition
Let's inspect autoexec.ipxe, which configures the network and loads the kernel/initrd:
#!ipxe
set repo http://repo.almalinux.org/almalinux/8/BaseOS/x86_64/os
set idx:int32 0
:loop
isset ${net${idx}/mac} || goto reboot
set net${idx}/ip 46.30.40.97
set net${idx}/netmask 255.255.255.192
set net${idx}/gateway 46.30.40.66
set dns 8.8.8.8
ifopen net${idx} || goto next_iface
show ip
show netmask
show gateway
show dns
show mac
kernel ${repo}/images/pxeboot/vmlinuz rd.neednet=1 nameserver=8.8.8.8 BOOTIF=${mac} ip=${ip}::${gateway}:${netmask}:::off inst.ks=hd:LABEL=NET2BOOT:/ks.cfg initrd=initrd.img || goto next_iface
initrd --name initrd.img ${repo}/images/pxeboot/initrd.img  || goto next_iface
boot
:next_iface
ifclose net${idx}
inc idx
goto loop
:reboot
reboot
And the ks.cfg (kickstart) file. The magic happens in the %pre script section — this is where disks are sorted and grouped (ssd, nvme, hdd).
%pre --interpreter=/usr/bin/bash
#!/bin/bash
mapfile -t part_disks < <(lsblk -b -d -n -o NAME,SIZE,TYPE --exclude 7,11,251 --sort SIZE | awk '$3 == "disk" && $2 > 0 {print $1}')
hdd=()
nvme=()
ssd=()
for disk in "${part_disks[@]}"; do
rotational=$(cat "/sys/block/$disk/queue/rotational")
if [[ "$disk" =~ ^nvme ]]; then
nvme+=("$disk")
elif [[ "$rotational" -eq 1 ]]; then
hdd+=("$disk")
else
ssd+=("$disk")
fi
done
disks=( ${ssd[@]} )
cat < /tmp/part-include
bootloader --append="crashkernel=auto" --location=mbr --boot-drive=${disks[0]}
part raid.10 --fstype="mdmember" --ondisk=${disks[0]} --size=4096
part raid.11 --fstype="mdmember" --ondisk=${disks[1]} --size=4096
raid swap --device=swap --fstype="swap" --level=RAID1 raid.10 raid.11
part raid.12 --fstype="mdmember" --ondisk=${disks[0]} --size=1 --grow
part raid.13 --fstype="mdmember" --ondisk=${disks[1]} --size=1 --grow
raid / --device=root --fstype="ext4" --level=RAID1 raid.12 raid.13
part /kvm --fstype="ext4" --ondisk=${disks[2]} --size=1 --grow
EOF
interfaces=($(nmcli -t -f DEVICE,TYPE,STATE device status | awk -F: '$2 == "ethernet" && ($3 == "connected" || $3 == "disconnected") {print $1}'))
mac_addr=$(cat /sys/class/net/${interfaces[0]}/address)
bond_slaves=$(IFS=,; echo "${interfaces[*]}")
net="network --device=bond0 --bootproto=static --ip=46.30.40.97 --netmask=255.255.255.192 --gateway=46.30.40.66 --nameserver=8.8.8.8,1.1.1.1 --ipv6=auto --activate --bondslaves=$bond_slaves --bondopts=mode=802.3ad,miimon=300,downdelay=300,updelay=300,xmit_hash_policy=layer2+3,lacp_rate=1"
echo "$net" > /tmp/net-include
%end
# Reboot after installation
reboot
# Use text mode install
text
repo --name="AppStream" --baseurl=http://repo.almalinux.org/almalinux/8/AppStream/x86_64/os
%packages
@^minimal-environment
kexec-tools
curl
%end
# Keyboard layouts
keyboard --vckeymap=us --xlayouts='us'
# System language
lang en_US.UTF-8
# Firewall configuration
firewall --disabled
# Network information
%include /tmp/net-include
network  --hostname=ctrl.net2boot.xyz
# Use network installation
url --url=http://repo.almalinux.org/almalinux/8/BaseOS/x86_64/os
# SELinux configuration
selinux --disabled
firstboot --disable
# Do not configure the X Window System
skipx
# Disk partitioning information
clearpart --all --initlabel
%include /tmp/part-include
# System timezone
timezone Etc/UTC --isUtc
# Root password
rootpw --iscrypted $6$qy3F2EczCMExy4WV$owLDd.zAmqG7OOYU1JMvbu0thZNFntSTrxuYSZ2d1CgLM2Y2fwr9232vIcx1NCHCjhxa2dKiJemC9fDo2N2e11
%addon com_redhat_kdump --enable --reserve-mb='auto'
%end
3. Connecting ISO via iDRAC
- Log in to the server's iDRAC.
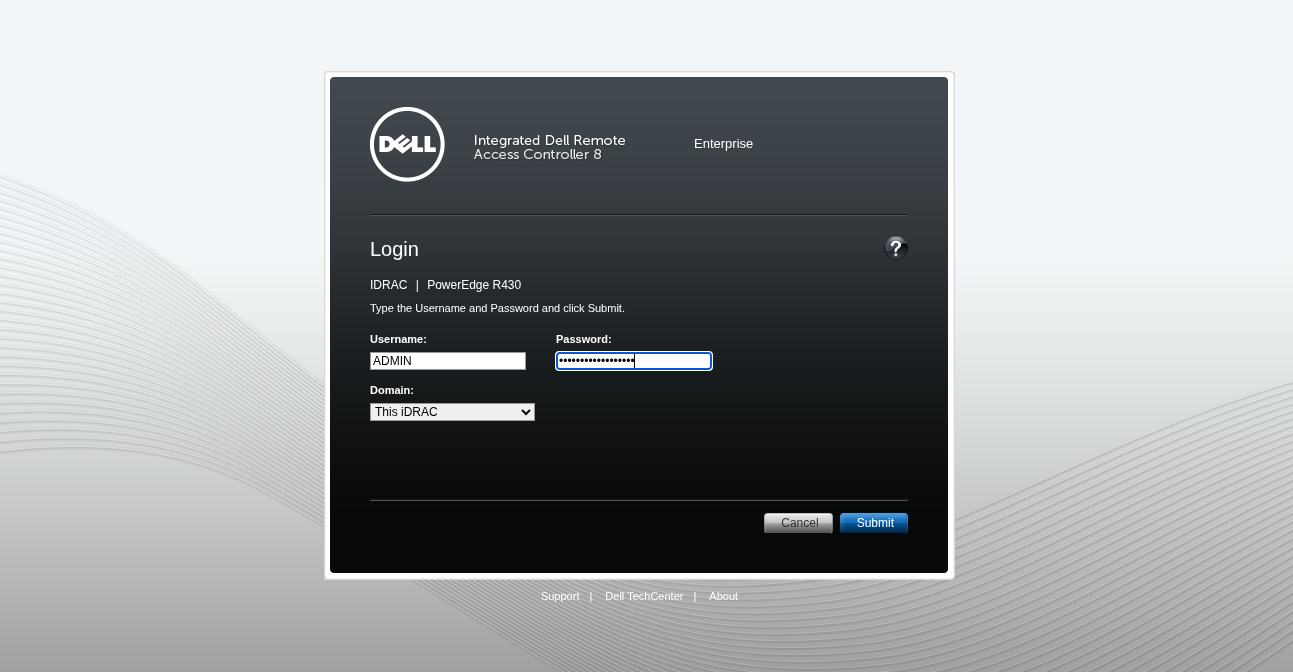
- Launch the Virtual Console and Connect the ISO via Virtual CD-ROM.
- Select boot from Virtual CD.

- Reboot the server.
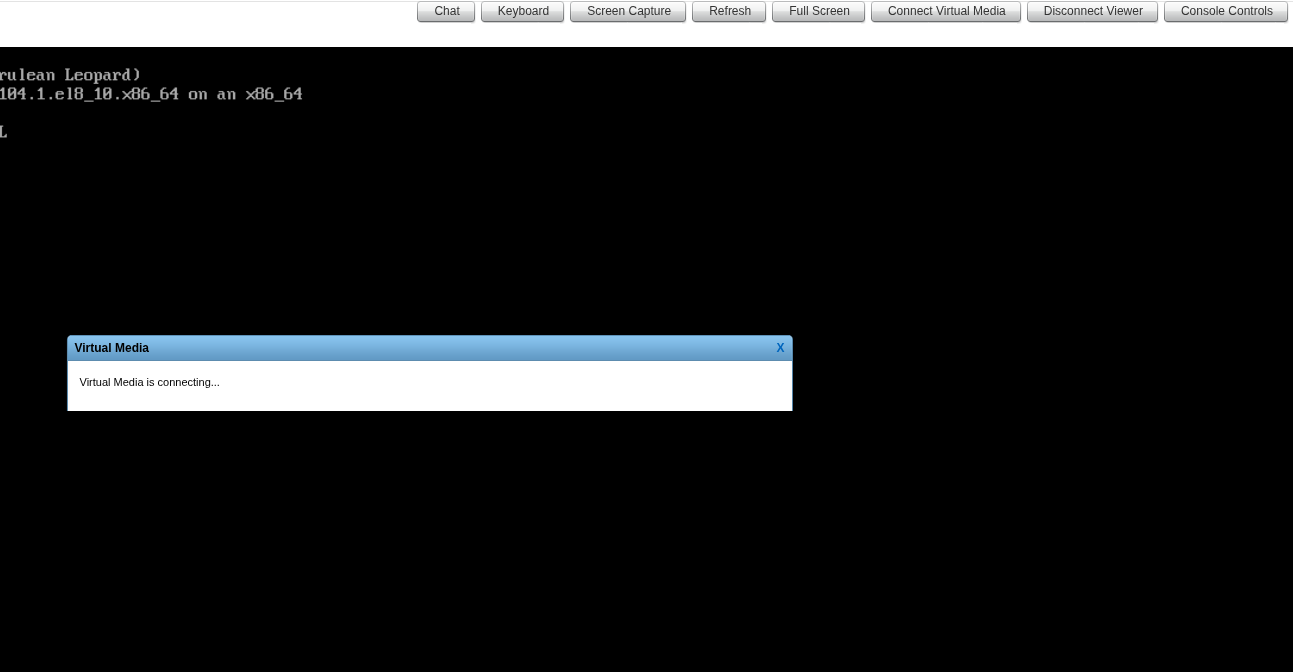
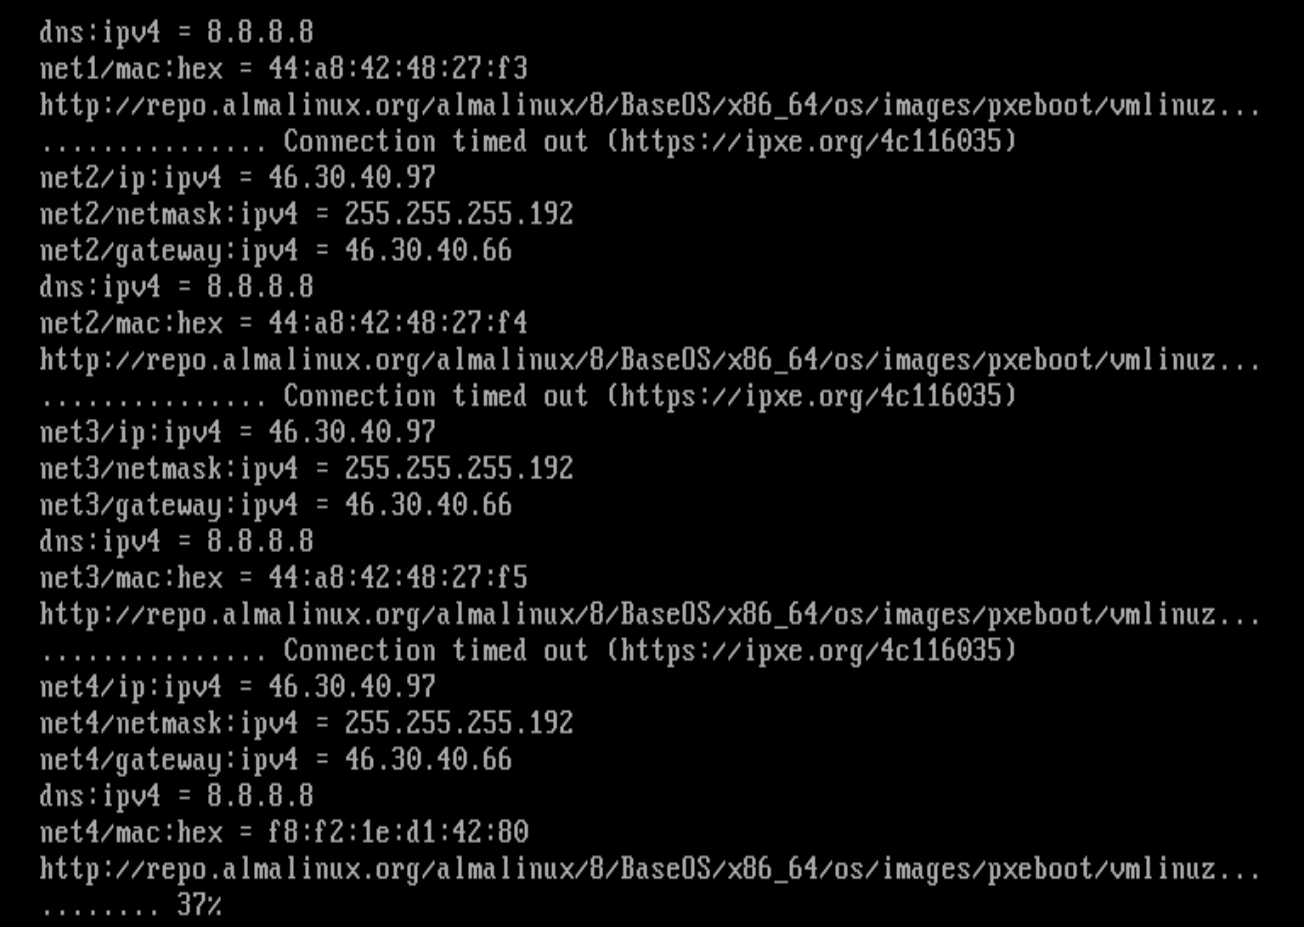
4. iPXE Network Boot Process
After booting from Virtual CD-ROM, the iPXE script takes over:
- Iterates through network interfaces.
- Assigns IP address, netmask, gateway, and nameservers.
- Downloads the kernel and initrd.
At this stage, you can see all boot steps — nothing complex, just watch.
5. Installation via Anaconda
Once the kernel and initrd are loaded, the Anaconda installer starts:
- Anaconda automatically uses parameters from the kickstart file (ks.cfg).
- The operating system installation begins.
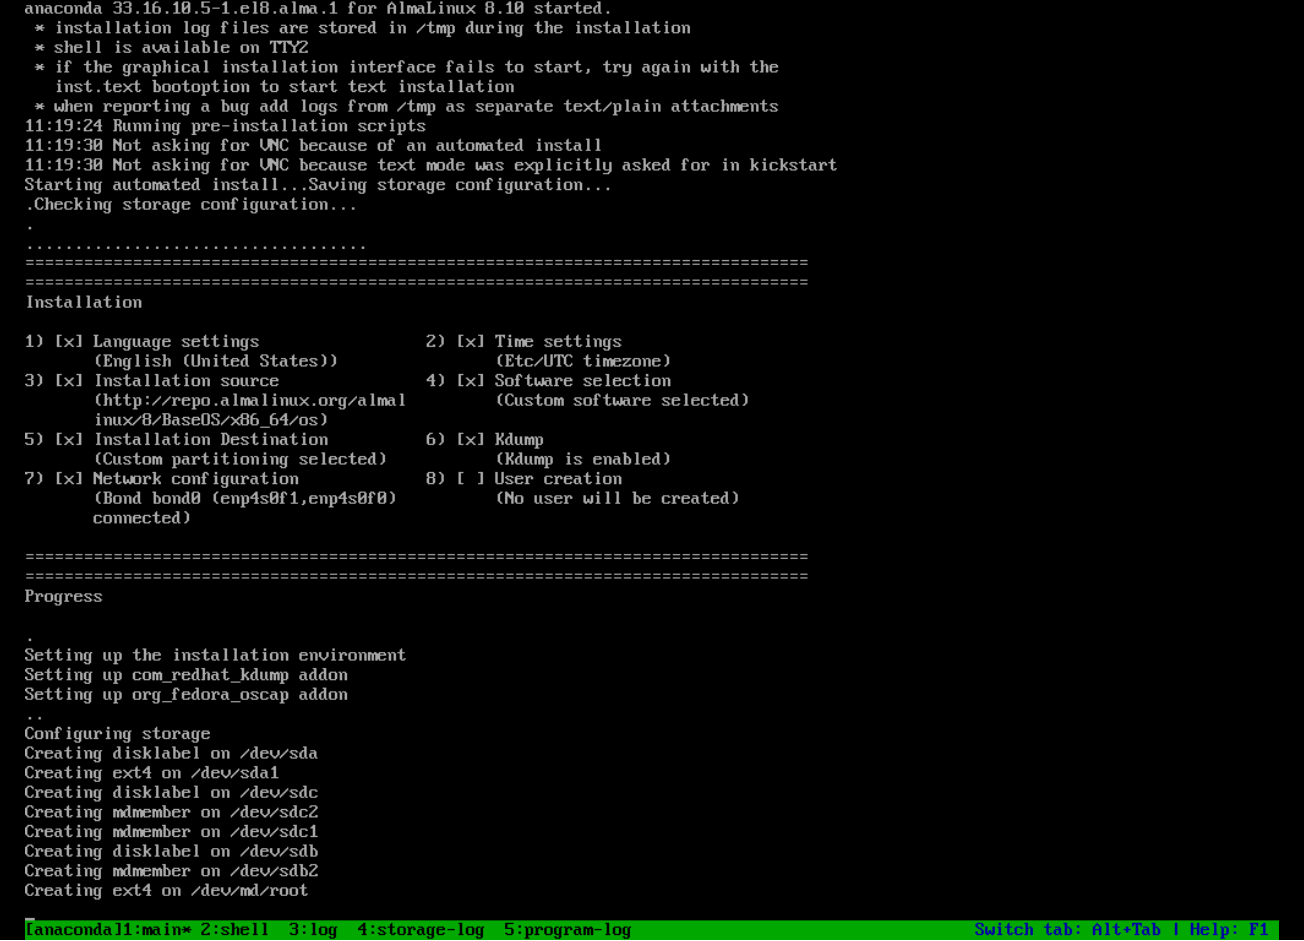
As you can see, the process is fully automated. You can go grab a coffee. ☕
6. Completion
Once installation is complete, the server will automatically reboot.
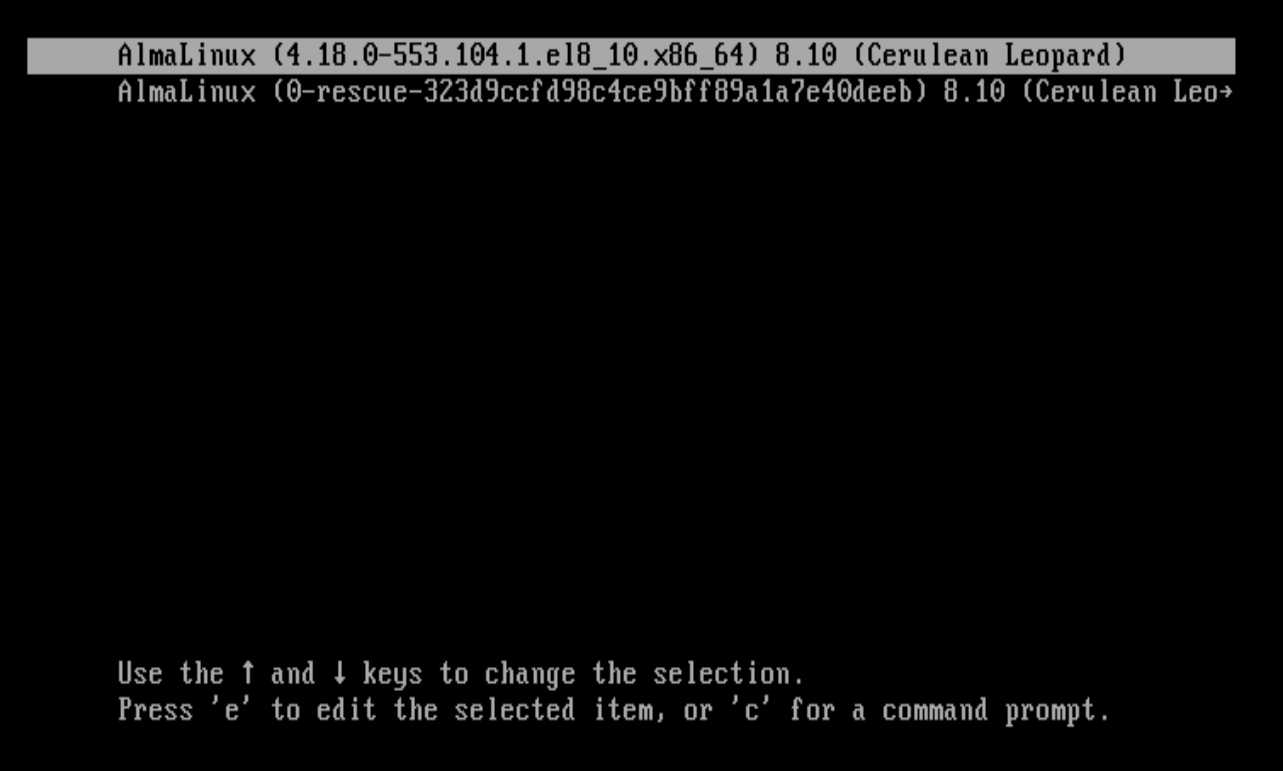
Done! Your server is ready to work.